Monday, September 3, 2012

How to make spam musubi

Although spam musubi is very popular in Hawaii, I never thought to try one there. It wasn't until a recent trip to Portland, Oregan at a food cart, did I think "where have you been all my life??" I normally don't like spam. I don't know what type of "meat" it is which is why I would never buy it. But when you combine a slice of spam that has been pan fried in teriyaki sauce, layered with sushi rice and wrapped in seaweed... mmmmmm! 

I made some last night so let me show you how easy it can be! (By the way, this is my very first tutorial so bear with me if I'm not all that clear)

All you need is:


1 can of Spam
1 tbsps of teriyaki sauce
2 cups of sushi rice (like Kokuho)
2-3 tbsps of sushi vinegar
4 sheets of seaweed (Nori)


I took one can of spam and I sliced it up into 8 pieces. I fried it up until it was brown on both sides.


After it's brown on both sides, I added about a tablespoon of teriyaki sauce. This caramelizes the spam and gives it a nice sweet taste.


I prepared some sushi rice in my rice cooker. I used Kokuho brand and after waiting for the rice to cool, I added some sushi rice vinegar and carefully mixed it. I didn't have a musubi mold (apparently you can buy it from Amazon) so I found something that was a similar shape. My ginger grinder had a catcher so I wet it with cold water (so the sushi rice wouldn't stick to it) and put sushi rice into my mold. 


My seaweed (or Nori) was already cut in half width wise. You can use scissors or if your Nori is fresh, you can just fold it and it will snap in half. I then plop the rice on top and place a piece of spam on top.


I then fold one side up and over. On the other side, I will dampen the edge of the seaweed with some water to be sure that my seaweed will stay together in a neat little pack like so:


TADA!!
This is my second time making spam musubi. I'm very interested in adding more things to this neatly packaged portable snack. Maybe caramelized onions between the spam and sushi rice. Mmmmmmm! Be creative and enjoy!

Monday, August 20, 2012

DIY Lululemon Vinyasa Scarf

I've recently tried Bikram Yoga and I'm still on the fence if it's something I can become committed to. After getting your sweat on, and leaving the place, I really want to throw on something loose and comfy. Lululemon has a great and versatile scarf called the Vinyasa scarf. There are so many ways of wearing it and I immediately fell in love with it... but not $50 in love with it. It's literally a big rectangle of fabric with some snap buttons on it. I thought, "I can make that!". There was only one site I found that provided a DIY tutorial.

If you want to find out how to make one, check it out here on this link:

http://hammersandhighheels.blogspot.ca/2011/09/sew-easy-diy-multi-wear-snap-scarf.html

I made mine out of bamboo fabric. I touched a lot of jersey fabrics which were cheaper (about $6 a yard) but I kept coming back to the bamboo fabric because it felt nicer and is a very breathable fabric. The fabric cost $15 a yard and all I needed, according to the tutorial, was 1.5 yards. I bought some snap buttons that cost me about $2. Sewing this scarf was the easy part. Hammering the snaps (and sometimes my fingers) was the hardest part. After an hour or so and $23... TADA!!

one way to wear the scarf
A second way to wear the scarf

Sunday, August 19, 2012

Wedding Jewellery

Yesterday was my friend's wedding and earlier this year I had agreed to create the jewellery she would gift to her bridesmaids and maid of honor as a surprise. This is why this posting is going up late. I didn't want to ruin the surprise.

A simple and delicate necklace
 The color of the wedding was a deep red which is why I went with a variation of reds in the jewellery.
A bracelet with the word 'faith' on it

And earrings to match

Friday, August 17, 2012

graduation cards!

I am so behind in my blogging!! I made this graduation card back in June for my sister and sister in law. It was fairly easy to make.  Check it out! 

The inside of the card I created by cutting out the graduation caps from a grad scrap booking paper I found at Michaels.

Monday, June 25, 2012

cake pops!!

Ever since I've seen bakerella's website, I have gone cake pop crazy! Not only is she totally creative, but her photography is awesome too! I took some advice from her page and did my own photography using scrapbook paper. Who would have thought that after a bit of instagram, it would look so professional. I made about 30 of these for a potluck. 

Cupcake pops in purple
All wrapped up
These are really easy to make too. Check out how Bakerella makes them on www.Bakerella.com

Sunday, April 15, 2012

Cream cheese and strawberries. Mmmmm!

There was a sale at No Frills on strawberries. $5 for 3 1lb boxes. They were a bit on the sour side even though they looked brilliant red so hubby found a recipe here: http://www.thesweetslife.com/2011/08/cheesecake-stuffed-strawberries.html
It was yummy and helped a bit with the sourness. The only thing I did differently was that I piped the cream cheese using a icing tip.

Sunday, April 8, 2012

sewing an iPad sleeve

Guess what I bought over the long weekend at Joanns? A sewing machine!

Pixie Plus made by Singer
Too bad I have to return it. I wanted to get a cheap sewing machine that would let me make small scale crafts. I am NOT a sewer. In fact, sewing intimidates me to no end! Which was why I went for this sewing machine. It's small, no frills with 8 different stitches. Too bad the grip on the foot is lacking so my material kept on slipping and sliding as I sewed.

Not only did I get a sewing machine for myself but I also got an iPad for my early birthday gift (thanks to my hubby!! =). Maybe I'm a bit abnormal but I was more excited about sewing an iPad sleeve for my iPad when I should have been playing with my new toy.

Like I said before, I am NOT a sewer. Big rolls of fabric scare me which is why I normally stick to buying 'fat quarters'. I didn't even know what a fat quarter was until a couple of weeks ago. Sewing to me is like scrapbooking. I'm going to stay very small scale in both respect.

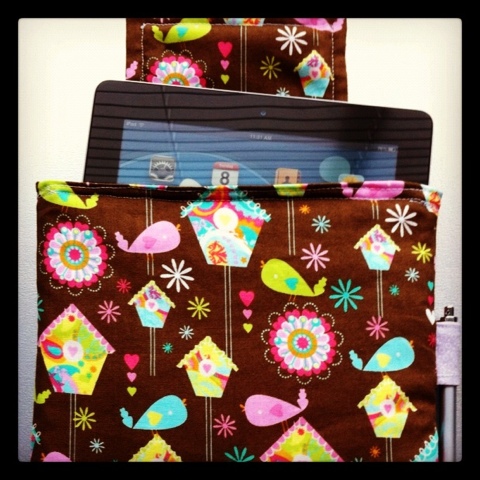
I had looked on a lot of different 'how to sew an iPad cover' sites and blogs and my eyes would glaze over because it looked so hard. I finally stopped staring and just started doing it. I dont have instructions for this cuz I was just freestyling it. 5 hours later and a lot of mistakes and seam ripping, I created.... tada!! An iPad cover!! It was hard, but I'm very happy with it.

iPad sleeve with the flap closed
My new iPad sleeve!!!
I just HAD to add some fabric buttons to it too!
And of course a stylus holder for when I need it for 'Draw Something'

Monday, March 26, 2012

hair ties!

fabric covered buttons can so easily be converted into hair ties! I made these for a friends daughter. I hope she likes them!

Thursday, March 22, 2012

cheese please!

this lil mouse measures about 2 inches high. he's a tiny little fella meant for a keychain.

Monday, March 19, 2012

buttons!!!

seems like all my new hobbies start from a $2 kit I find in a dollar store! I never knew one could so easily make fabric covered buttons.

bunnies!!!

Just in time for spring! Check out the cuties! I first saw the bunnies on this site (sooooo cute!!): http://oneredfox.blogspot.ca/2011/11/ahhhhhprepare-for-utter-cuteness.html and I made the bunnies following the pattern I found here: http://blog.craftzine.com/archive/2011/04/craft_pattern_spring_bunny.html

he has a scarf on because it's a cold spring this year!
aww... she's shy!